2016/11/25

2016_11_25 And so their was light!

2016_11_25 Aldi 10m connectable (to 40m) rope lights-Just $17


All lights off and no flash! Its very dark outside.  No (real) moon Just strip lights... Oh I like that 👀


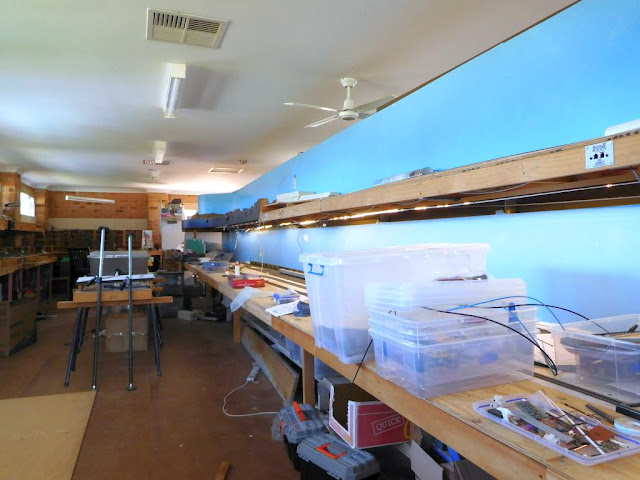
Strip lights (both sides) just standing back a little. I could negotiate the mess on the floor, easily with this much light. These strips are sunny white 5m and cost me $8 each plus shipping from China.


The other side with blue Aldi lights on Wodonga side. As you can see wiring job has become a re-wiring job, but I am getting through a lot of modifications and can soon tidy all this up.


Only light on is the rope light. I think I can bare looking at a "blue" moon 😆 I think I will fix it  to top of back scene board, out of sight under layout. I think 4 strips will be quite bright. Might have to reduce the voltage a little. In fact joining a second strip, may do that for me.


Interestingly in this shot the sunny white strips are on and so is the blue rope light. The blue was very bright, but easily overcome by the sunny whites. I wonder if the fader controls will work. I would need to parallel 0 to 36 volts with 12 to 0 volts to get the effect and I'm betting I would need to do that electronically, which bests my analog skills.

Ok had my coffee, time  ⏰  to get down and dirty on my floor once again. 
 Well the trolley at least keeps me above the floor these days. 😌
Cheers
Rod

2016_11_24 Al came over again for more torture.

2016_11_24   Paint the wall. a little carpentry and then the two of us tackled some wiring.


It seems that my mistakes are not looking far enough ahead, or perhaps I am just less observant than I once was?
 The high level road bed was already clear of the lower level SG track. It would have been far better to lay this baseboard against the wall from the turntable on. It was only when I was looking for a place to put the table that I realised I had clear acess from underneath.
The supports are screwed tightly and appears solid, so I just added another support against the wall and will glue the foam board between that and the baseboard. Actually an easy fix, even if the original mistake used resources and time unwisely. Particularly as I have a good friend helping me get this side finished.


Whilst messing around with the timber, Al painted the wall. Thanks mate.

After this we fixed some more wiring on the Wodonga station board. Some jobs were two man easy, and a lot more difficult on my own. We fixed all those!


Ok so now all the wiring underneath this section is either fixed, or easily fixed on my own. And thats tomorrows job!
Above you will notice that I have removed the LED strip lights and cleaned the venetian blind slats and re-glued the strip back in place.
I used hot glue, and I was very lucky not to destroy the strips. As it turns out the leds are soldered on to the strips with low temp solder, and the hot glue damaged one strip of 4 LED's. It could have been much worse.  I will use "no more nails" in future. But the lights are now out of sight and give great illumination. Some say you need three rows of light strips. That's not for me. I am not modelling a desert scene, after all. You might notice on top of the track some rope lights? These are 10m Christmas lights from Aldi. They can be connected together, up to 40 m, in length, but from their instructions, I am not sure if one power pack is enough for all of them??  But at $17 a box, good value. These are a blue light strip, and will be used during night time running to simulate moonlight.


This is the other side of the island baseboard. Wodonga Coal Siding. These lights were put in 2 years ago, and I attached the LED strips to venetian blinds (as reflector) and to hold them straight I screwed it all to a strip of 35 x 18 pine. The strips have stayed attached, however the wood support is a pain to work around and it certainly does not look great. But it works and will stay in place.

Ok thats it from Al and I for another good "Al-Day"
Cheers
Rod

2016/11/18

2016_11_18 Alday!! eh Thursday work day ;)

2016_11_18   Another work day with Allan Jeeves in attendance.


Had a great day, with both of us laying track in different locations.


So Al levels and lays the track on the new add in section of Honey Suckle.


And I work on track laying on the trestle. I had to cut the trestle back about 25 mm and set it up to allow a smooth 36 inch curve into it and exiting it. Worked out well, but time consuming, like everything else on this railroad ;)
Next job is to install the junction and then lay the track on the other leg, back towards the Bowser junction.

At about this time, we looked at the other end of Honey Suckle.......


And I mentioned to Al that I had a short turntable I would like to install at this station. We worked out where it could go, and modified the track bed to suit by moving the whole assembly 55 mill closer to the aisle


So with this section all levelled up and relocated, I have room for the turntable in the new box section we will build between Honey Suckle and the relocated track bed

As the track against the wall can be easily accessed from underneath, now, I will join the high boxed roadbed to the wall with that high density foam, behind Al, here..

We are getting to a place where we have to decide on what to do with the Helix.
Enough for now.
Cheers
Rod

2016/11/13

2016_11_13. So lets plan out a steam to diesel era Loco shed.

2016_11_13  All my buildings are stored away in boxes, scores of boxes and...

 Took a short break from wiring and cleaning up this morning, and looked to the Wodonga (eh? freelance?)  Loco sheds.


Have a DCC Walthers turntable (Has that hole shrunk?)  and a nice Victorian steam / Diesel conversion round house.  Yes I know Wodonga had a brick with iron extension long shed, but hey..."its my Railway"  he he. The shed was designed and built by Stuart and Mardi of

Model Railway Buildings by Walker Models Model Train Buildings

I have a box full of bits that might dress up this rather large space, and a friend is casting some between the tracks, inspection pits.

But first I need to design the track and set it up to make it look as real as a fantasy can be.


Cheers
Rod

2016/11/12

2016_11_12. Little jobs that take a lot of time

2016_11_12  So its time to catch up on all the jobs which were bypassed earlier.
Even room for new work?

Wiring Jobs?


I guess I just cannot work in a clean environment :D

First job I tackled was wiring up Honeysuckle. Ths meant extending all the cables to cover the extra board added. This took a couple of hours over two days, and two visits to Jaycar to get plugs and wire.


So now all the boards are connected, and I thought I could turn the boards over. However I have no idea how to connect into the DCC system. To the right hand side are two computer power supplies. I believe one supplies signalling lights and point power. The second appears to supply DCC power. Unfortunately adding Honeysuckle into my layout will negate the need for independent power, and I also need to introduce the command station (not present).
I guess I can isolate the bus if I can work out where it is, and connect to my own bus used throughout the layout, and  that will use an existing command station.
But as Tony is visiting in two weeks, I might just wait for him, to see if he remembers how he wired it all up. Depends on how patient I am :D

Still on wiring?  Well here is a bit of spaghetti that needs finishing off


I have my trolley working well, and getting into spots much easier now. And with a new pair of single lens glasses, am seeing much better. Most of these wires have found their connections :)  Just a few points and live frogs to track down, and a Hex Juicer to connect up to route power through the frogs.  (Google DCC hex juicer)

 Plaster Walls
Graeme Schulz called in for an hour or two and patched up the walls, whilst I continued on with wiring (rewiring?)


 Next weekend he will sand back and patch up any holes so I can paint both walls. Nice to have friends. I guess we are all looking forward to running trains again.
The helix was laid out on the floor. I am thinking about reducing the diameter down to 80 inches.
The trains would climb a little quicker I guess. Hidden trains traveling slowly diminishes the fun. You need to see something to enjoy it, I reckon ;)

The Loco and turntable space

Finally got the Wodonga Loco Area cut out and screwed down. Its actually freelance as I just did not have enough room for the real thing.
The track enters from behind the Goods Shed crosses High street and then heads for the turntable via track work used by the fitters to service engines, change blocks etc.


Going to build a Car Shops and Roundhouse here as well.

Well that's it for me, another Saturday, and only a little progress, unfortunately.
Cheers
Rod

2016/11/10

2016_11_10 Thursday Workday....

2016_11_10  Al came for a days work...

No pictures today because we got bogged down.
Remember the power points behind the wall under Albury?
Muggins here decided that we could spend a few minutes transferring them to the outside and bringing them into use.. well by 4.00 pm, we were sore and we were exhausted.
Al  found the spot and we decided to cut through the plaster and hook them back up again. It was a bugger of a job.

In the meantime I had to make up some new connection looms for Honeysuckle so we could get that back down and installed...  We then thought we could connect up all the track. Well maybe next time :)

Thanks Al, we did actually get some lousy jobs done. We did good :)
We have both double power points back in use. As well we have the camera points set up on top of the wall. Yeah, we did all right.
Cheers
Rod

2016/11/03

2016_11_03. Wall construction nears the end. Plus.....


2016_11_03  Al and I continue constructing the wall Plus we mount the union notice board.

For a short time the local model railway club was in the Wodonga Railway Station. When we got the boot, we were told to take the fittings if they were useful.
The Club took the 5 notice cases that lined the walls of the meal room. This is one that I got from that Club.


Originally I was only placing plaster on the frame. However we left the overhang to cover the conduit.


Al checks the level. We had a great day. We were both sore and tired. Despite multiple measurements, and off cut plaster boards we got the job done Eh Al?  :D
This wall is the one closest to house. As a result, I did not insulate it, as it is in shade 80% of day.


Al said its not square. Well it looks fine to me :)


And after I cleaned the glass and Al the debris of over 10 years storage, the Wodonga AFULE union notice case is finally recycled. Graeme Schulz modified the case with shelving and increased the space between the back board and glass. Thanks fellas.
I really appreciate your help with this project. ;)
Had to move the aircon switch. Need to fix that in place, the photo suggests :(

I was doing some wiring yesterday and was having difficulty bending and looking underneath and upwards. Not even sure I could do that as a young man. But quite impossible at my age!


I recycled the Honeysuckle panel to lift my wheeled rolling bed, which has done the trick. Easier to get on top of, and am now close enough to the action to work my magic on my spaghetti wiring :)
Cheers
Rod

2016_11_03. Wall construction nears the end. Plus.....

2016_11_03  Al and I continue constructing the wall Plus we mount the union notice board.

For a short time the local model railway club was in the Wodonga Railway Station. When we got the boot, we were told to take the fittings if they were useful.
The Club took the 5 notice cases that lined the walls of the meal room. This is one that I got from that Club.


Originally I was only placing plaster on the frame. However we left the overhang to cover the conduit.


Al checks the level. We had a great day. We were both sore and tired. Despite multiple measurements, and off cut plaster boards we got the job done Eh Al?  :D
This wall is the one closest to house. As a result, I did not insulate it, as it is in shade 80% of day.


Al said its not square. Well it looks fine to me :)


And after I cleaned the glass and Al the debris of over 10 years storage, the Wodonga AFULE union notice case is finally recycled. Graeme Schulz modified the case with shelving and increased the space between the back board and glass. Thanks fellas.
I really appreciate your help with this project. ;)
Had to move the aircon switch. Need to fix that in place, the photo suggests :(

I was doing some wiring yesterday and was having difficulty bending and looking underneath and upwards. Not even sure I could do that as a young man. But quite impossible at my age!

photo here!

I recycled the Honeysuckle panel to lift my wheeled rolling bed, which has done the trick. Easier to get on top of, and am now close enough to the action to work my magic on my spaghetti wiring :)
Cheers
Rod

2016/11/02

2016_11_02 Maintenance and Fixing wiring days.

2016_11_02 Then there is the old fix up previous mistakes days!

Its been a long time since the track was fixed to the island benches, and I have just discovered that the cause of my shorts has been here all the time.

I have a heavy duty (45amp) ring main bus line that runs all around the layout.  At an earlier time, I introduced power sections by introducing modified DB150 Command stations, and divided the ring main into 5 sections, each fed by a command station.

Recently I divided these sections up further by using NCE circuit breakers. At about this time, I discovered many problems, loss of power and random shorts, which I have been trying to fix.

As the middle island also turns into a reverse loop, I used reversing switches to allow trains to seamlessly complete the very long loops.

When one continuous ring main power bus was in use, it is certainly the reversing sections that saved the day. It seems the reversing sections ( the whole power districts) fixed the polarity problem that I found over the weekend.

The changes stopped the interesting, unexpected, fix and created a short which I could not locate till today.

The easy fix is to just reverse the wiring for all track sections in the island modules. Every where else the black rail is the outer or wall side of the layout, and of course the red rail is the inner.

For some unknown reason, I wired the module starting at Wodonga, which put the black wire on the aisle side, but when I worked on coal siding I continued the black wire to wards the wall and the red wire towards the aisle, creating the conflict.
I have now cut the bus short between Wodonga and the main layout and am presently swapping the red and black wires on each yard length of track, to keep the same standards used everywhere else.

Its going to take some time!


Using plug clips make things easier. I could have just swapped them all over. Decided that in the future it was going to be simpler to keep the common code, so I took the harder option, or changing every wire over, all approx. 130 pairs :(


Repeat after me... Red to aisle, black to wall...
repeat after me.... Sg is connected to blue wire, Bg is to the brown wire.... Black to black, bus DCC!!

Cheers
Rod