2013/08/18

2013 August 18


2013 August 18 Sunday  Another wet day?  this is the longest spell of rain arriving every afternoon, I can remember up here.
How long before some cash starved Scientist starts claiming that the Ice Age is coming back and we need go all green to protect from floods and serious cold temperatures :D


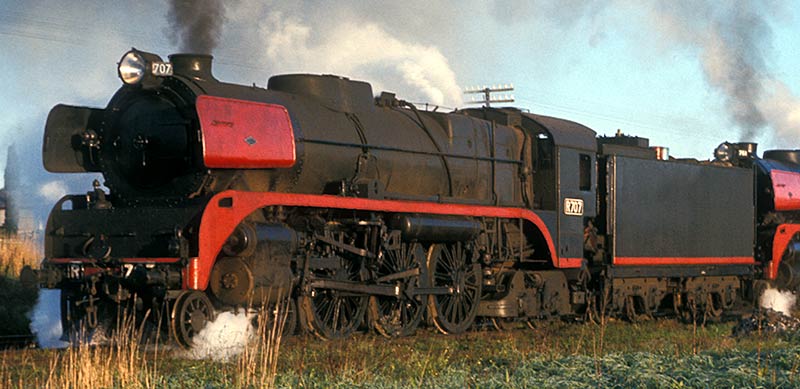
This is supposedly the final paint sample of the Eureka R  Thank Goodness the front coupling is fixed and I hope we are not going to see those awful driving wheels? that look nothing like the real thing.
After waiting for so many years, one would also hope they will be blackened rather than slightly darkened?  and what is up with their crazy buffers?   Oh well ready to run or not I can probably disassemble the wheels and paint them black, mask and paint the buffers, and if I was really serious I guess I could source the correct wheels and change them over. Wait a minute every driver has a gear fitted, not sure anybody will be up to doing that :(

This is the real wheel

Here is one of the pictures supplied by Mark Bau on his site. How could anybody not see that they are different?

This weekend I was away in Melbourne. I took the train from Chiltern to Southern Cross where I met Graeme (who helped me a week or so ago lay out the Coal Siding) We spent a few hours searching the shops at Spencer Street and walked to the Docklands where we sat around and waited for a key to turn up to gain access to the Hobsons Bay Club.
We were there to attend the AGM and see a committee installed uncontested. Sad state of affairs, really.
The good part of the trip down continued after I decided to delay my return home by stopping off at Kilmore East to visit Tanya and Steve Munro and conduct an inspection of his new train shed :D


Here is the new shed.


Fully insulated and lined with LED lighting, construction already on the way. The studs are secured through the plaster onto the shed studs, and the tables are hung off the new studs without any other supports.


Here is Steve's helix, and just to show their are many ways to skin a cat. This one is about 40 inch radius but supported on one side only. The ply is also supported with pine spines underneath. Steve and Rob are using this to climb about the same distance as mine, however Steve opted out of keeping the climb under 1.5 % and this enabled double stacks to run, at reduced train lengths. Thisply will never sag like mine did in the finish.


A horizontal piece is glued to a central spline evenly spaced (100cm) around the helix, and the roadbed rises 3 cm and between supports (3%) then central supports are cut in under the track bed, to firm it all up. Once the first level is completed the other levels were added by maintaining a predetermined space on each support.


It is sturdy and very neat and does a very good job of it.


.

Ron finds the studs and firmly attaches the new studs on top of them.


The double main line enters the helix on the bottom circles three times, and exits on the middle level. From the middle level the branch enters the helix and climbs to the top level circles only once.


Using the studs that is 3" x 2"  (What is that 70 x 45 ?) creates a very strong self supporting table top. After seeing this, I am really disliking my "L" Girder technique, and it has started to annoy me. I think I am going to rebuild the top deck from the Helix onwards using Ron and Steve's self supporting studs.


The bottom level does have legs!


Skirting board cut outs and pre drilled pieces helps with installation.


Here are three different ways of introducing maximum stability and strength.


This is the secret in my opinion.
The cross support is rebated with a router  and glued and screwed accurately to the stud.
this means that the integrity of the join is now not just glue and screws, the rebate edge is hard against the stud and adding to the strength of the join.


Of course it is an added advantage if the Cabinet maker is named Ron and he gets the bug whilst helping you with your benches, goes home a builds you a trestle bridge :)


These two get on pretty well together and it did not take very long to get this far along the new wall. In fact 30 minutes later the table top was cut out and the openings in the top for the studs were all cut and the top was dropped down to exactly fill the corner where Steve is seen working here.


I really do wish Steve had been able to build this shed 3 years ago.  I learned what my Router could do today, as well I got a lot of great ideas, and I trust you did too.
Cheers
Rod

2013 August 14

2013 August 14  Wednesday Night

Tonight is Murray Railway Modellers Club night.
However as the Show Grounds is leased out for our Annual Caravan show, the Club was closed and the guys came to my Railway for the night.  I did not take any pictures and more than 10 came and seemed to enjoy themselves. Pity about the refreshments, and I guess Steve is still waiting for his can of coke :) Thanks to Graeme we did finally get a cup of coffee though :D
I will post some pictures if anybody took any
Cheers
Rod

2013/08/10

2013 August 10

2013 August 10  Saturday cloudy but Sun is warm when its out. The ground is very wet still, and I just turned the heater off at 1.pm.

Well the Walker 280 arrived these last few days, my bank balance suffered a hit from Trainorama on the 8th, for the remainder of the GM payment, but I have not yet got my parcel.

The last few days have been bedlam as I tidy up the shed and try to get something running by Wednesday night.
Because the Club rooms will not be assessable account the Caravan and Camper Show is occupying the Show grounds for the next 10 days, and I opened my trap and invited the Club to my place for Club night on Wednesday.

The droppers are all in place, just need to join them in, all 127 pairs, to the DCC main.
The two temporary Control Panels are built, and I need them to work because I am using servo motors to switch the points. These are DCC controlled, however push buttons are also provided. The wiring provided is much too short and I have lengthened them by adding similar wire in the middle.  So now I must mount the point machines and join up the plug in lengthened cables

Next job will be to put in the  remaining BG tracks, and wire them in as well.

Ah well it is not going to get finished, is it?  But when I do take some photographs, I am sure you will all notice the difference :D

Oh now I have visitors dropping in on their way to Sydney. Staying the night so thats Sunday gone too.
This morning has not been model train beneficial to me either, as I am baby sitting my beautiful Grand Daughter whilst her Dad is cutting up fire wood. He is late and still I am not into the Train Room, visitors arriving in an hour or two :(
Cheers
Rod

2013/08/04

2013 August 4

2013 August 4

Another cold day. Finished up putting an overcoat on to work in the shed Brrrr!!  However it was not as comfortable as my dressing gown which went over the top of a jumper and two pairs of tracky pants two pairs of socks  Brrrrrr!!

Anyway spent part of the day clearing out stuff from under the bench tops to gain access underneath for wiring. As well I sorted through all the electrical bits, electronics and got them unbaged and ready to install

The Tam Valley point switches required soldering and two switches and two LEDS need to be installed before mounting on the Control Panel. I prepared these for work on tomorrow.
As I use dual element stop/tail bulbs for circuit protection with a protective solid state link between the elements, I did spend a few hours attaching the parts and wires and stock piling enough to finish off the Coal Hole. Guess these will get placed  this week as well.

Just a few more boxes to move underneath the bench and work can start tomorrow
Guess thats all folks! :D
Cheers
Rod

2013/08/02

2013 Aug 2

2013 Aug 2  Nice day but at 2.00 the skies opened up once again, a "light" monsoon developing as this is happening every day??


Well now that both tracks have reached the "coal hole" its time to match up this end of the yard with the bits Graeme and I did a month or so ago. I need to be careful here and make sure the tracks meet exactly to be visually pleasing at least.


Just a little bit of a laugh.  I have twice this many clamps and I am a real fan of the little one handed clamps. I did buy a new pack today because I could not find any not being used.These Irwin clamps are the Bee's Knees ;) 4 for $30 at Bunnings. I am now only buying the good quality ones, because the cheap ones cannot take heavy use, tightening them up can easily break the plastic shafts used to make the trigger pivot. Not a hard job to fix, because I simply drill out the casing where the broken shaft was and replace the shaft with a bolt and a nylock nut. However it is a waste of time when a pack of 4 Irwins cost about the same per unit as a cheap one. When I returned from Bunnings I was searching for something else, and found the missing clamps :D and here is a clamp tree just to say "You cannot have too many clamps when you are building a model railroad :D


Two days on and the SG yard at Coal siding is nearly installed.
The track closest the wall is BG and the next one is the SG main. The next one forms the No2 Road of the crossing loop.
Then two more store roads and I should have three but just could not fit it all in.  The closest rail, which is yet to be laid will be the Bogie Exchange road. I will lay this in code 100 and change to code 75 inside the BE shed. The track inside the shed will be insulated and dead to DCC. This way the Unimog that will shunt the shed will need to use a match truck to shunt vehicles from the SG side and the BG pilot will do the BG side. In the 70's a BG pilot was at the Coal Hole all day. Usually F206 or F216 and I have a Trainbuilder one for the job.

So now I have all the SG work done on top of the board. Next job is to clear the clamps and also remove all the stuff stored under the middle modules and use the old mans wiring bench to fit the point motors and also connect up the wiring and install the Hex juicers and circuit breakers.

Cheers
Rod