2017/01/26

2017_01_25 (Re) Wiring continues!

2017_01_25 a week of tracing old wiring. Lots  replaced and track modified or extended where necessary.
Soon every fish plate will have droppers either side. Now that's security (and time consuming)
Some pictures.....


So first job was to overcome some problems with this point. Its a RailScale No.6 code 70. I keep breaking the throw bar, which means the mechanical connection between the Tortoise and point is set up wrong.  Very little room to work with underneath. Still ongoing, solution not yet found.


And to the right of it and below, I have the SG loop into Wodonga that has not been completed.


As well I have spent a lot of time tracing that last 'short'. I now have a Yellow track power light on every command station, but I still get 6 beeps on start up, and a red flashing fault light on one station.
This tells me that I have two command stations hooked into the same track section. So I am moving around the layout tracing all wiring, and finding all insulators.
So far I have found every district is insulated. Starting to think, perhaps some defective insulators (more precisely one?) has allowed the rails to expand and touch. I have used other types of insulators as well as peco type insulators. I think Peco is a secure design?


First major fix was to relocate the reversing track sections from the other end of the island  to this end. First reason, was that Evans double track Y points will be right where the reversers are presently situated. And secondly, this area is where two track districts actually join. That must be better than reversing in the middle of a district?
So this section from the bridge  to the curve is the new reversing sections between the lower level island sections (BG and SG) and the layout around the outer walls of the room.


humph!!  still a lot of wiring to re-rout including the three 240v  power boards in this picture. The reversing sections were on lower level where Evans double Y point is leaning. It seems my railway has entered the age of prefab point construction, making for a shorter shutdown when installation is to be acted on.
I finished up replacing one point on the SG loop, because it was an insulfrog on criple road, and I could see that that frog was going to take a beating during running.


so here it is all finished except for the point motors. All I need to do is replace the missing sleepers. Then  continue around from here and fill in a few gaps in the SG, Still more droppers to install as well. I am finding a lot of brads are pulling the sleepers down. Certainly over hit in. I am replacing these with Peco flat head tacks, being careful to locate the track only, not hold it down. No bent sleepers, and tacks can come out when ballast dries.


I did have the spaghetti neatly tied up with ties, however will have to do it again, when I am satisfied the wiring is complete and working as it should.
Cheers
Rod

2017/01/21

2017_01_21 Warmish and US mates have a new President.

2017_01_21 Not much to show, been underneath wiring permanent runs in place.

Also figured out where I changed the rules and messed things up, 4 years ago. Correcting the mistakes is taking heaps of time. But temporary wiring is slowly becoming permanent good wiring. That IS satisfying.

I have followed the US Elections a little too much. But I will say, I am happy a Businessman has a chance to prove he can do a hell of a lot better than a "politician". Politicians and Bankers have stolen the US from the people. Lets see if a non-politician lives long enough to change the US and by default the World, for the better. However the dirty Bankers are going to do some damage after not getting their way. I think real silver and real gold is going to be the way of the near future. A cup of coffee might cost $500 if the bubble does burst, and ordinary Australians may not escape this time.

Ok had my drink, its time to put another few pairs of droppers in, before I come in for a meal.

Ok did a bit more!


ok this whole curve plus the straight at the further end was not fitted droppers. As well the gauge was tight because nails were bending sleepers. So removed both tracks and wired them on the bench and returned them to position. Good fit remained ok.

Recently I was finding trains were stalling here, and so I need to drop the whole track at least 10mm along this wall. So that is going to be next job. Set up string line and lift and screw back in new lower position. This whole track is dead flat. Rail rises from house creek and trains stall about where straight track starts. dropping it should give train a chance to get to flat section, before climbing grade once again. Trains do not stall on second section, hope the extra 10 mm does not upset that :(


Just 10mm might be all it needs, any more and second grade might be too much. The adjustable level is showing flat and angle zero.
Cheers
Rod

2017/01/19

2017_01_19 Wiring blues, and red and black and.....its another ALDAY.

2017_01_19 So despite lots of things getting in the way!

Today was a day put aside to wire the Coal Sidings. Ok trains had been running? so a couple of hours and it would all be working?

Yeah right!  First thing was to power up the DCC bus then disconnect all other districts.  All good :)
Check loom to see if it was all in place? all looks fine.
Test DCC main...  All fine......  Connect BG and SG districts via fused local bus (using common black DCC bus to return.    oops a short. Disconnect local bus. Short goes away.
OK using the floor trolley, I disconnect every dropper from BG and SG local bus. The wires are  clean tied off at each end and still we got shorts. Spent two full hours trying to find what is wrong? Where is the connection that must be there and yet we cannot see it?
We remove track, and insert insulators to guarantee reverse loop is not interfering with bus.
Finally we isolate it to SG.  We disconnect it and short on BG disappears! OK check points and crossovers?? Nothing obvious, however I am thinking of the Kilmore East quarry fiasco. Might have to lift diamond to see if the bridge connections have been removed. Notice code 75 / 100 converters are being used as insulators here as well.

So we continued down linking every black wire to the black bus, found two track sections had red wire and black wire transposed. Damn. I put shrink tube black and red sheaths on each cable, to remind me what I have done in the future. Too much work to get up off my back on the floor and un-solder each wire. We have been here all day as well.

We turned it into a two man job, simply because laying on the trolley, I was taking so much time looking for tools and getting up to find cut,  wire etc etc.  I am sure Al was disappointed, because we did not get anywhere near finishing this job. But I can think of no way I would have got this far without him on his feet and passing me stuff as was needed. Now short has been isolated, we should go like a house on fire in a stiff breeze.
Some pictures!


So look at the blue back board?  The track closest to back is the BG main to Albury from Wodonga.
About the middle you might just see the loop for the BP oil siding?
We finally got this little bit of track wired in and working, and yes we were disappointed. :(
We did replace some wonky track two small lengths with one full length of track, insulate the reverse loop on SG and connect the track juicers that reverse polarity in tandem if a train enters from a direction reversed and tested them as working.


And T375 actually does get to home protecting the BG / SG Southern entry to Coal Sidings.
 have connected points to bus, just need to add juicers to switch frog polarity of points as needed.
And here is the Diamond that might be shorting out the BG track. Photo shows it wonky this end too. So fixing the diamond may have other value as well.

Laying on the trolley, on the floor is not that great. After an hour there, I almost need help standing up. Back and chest quickly get better as I move around.


 All black wires tied and connected. Should not be a big job to connect red droppers to correct mini bus, if the short can be eliminated on the SG.

The tail lamp globes should be removed, and probably will be. They actually come on very bright when a short occurs, then fade to the lowest wattage as the stop light switches off with a solid state switch built in.  The light warns of circuit shorted out. All of these globes are fed into an NCE circuit breaker. The globes actually stop the circuit breaker from opening. I am thinking the circuit breaker can do the job better on its own.


 There are  long red , black and Green wires running under here. No idea why?? So all remain disconnected ;)

Cheers
Rod


2017/01/15

2017_01_15 Still slogging on.....

2017_01_15   Since last update wiring, rebuilding points track laying!

Last Thursday was ALDAY and we laid out the rest of Wodonga. Although we got into trouble with the turntable. First, I dropped the table and broke the bridge power pick up tower.I did not know the bridge was just sitting in the deck, and when I turned it upside down, it fell a few inches to base board. It is heavy and the mast shattered. Fixable and I can build an Aussie version out of H girder like the Wodonga one was.
Programming it has been interesting. It keeps throwing up an error, I will have to search google and see how others have managed.
So whilst Al continued on with track laying, I tried to keep ahead of him. We used brand new Shinohara code 70 points, but they were DC versions, and each one needed to be upgraded to DCC compatibility.  Easy enough, just time consuming. However it is a cheap way of getting points. I  recently picked these all up on E-Bay  in a bulk deal for less than $6 a point :D
Pictures?
Ok lets start things off....


Useless instructions hindered and caused more problems than helped to solve.


I have finished mods to third point "just in time" Al started on underlay, and we both got the turn table to sit flat. However cutting holes for the locating pins, was not helpfull. Now the deck sits too low and we had to lift the table to sit it higher to line up the rails. The holes need shifting. They are not all 113 mm apart most are but two are at 110mm  and 112mm. To line up with the two roads I need to recut a new set of holes, or better still snip off the lugs, which seem only useful if you are using a Walthers engine shed??


 Wodonga had two roads to the turn table (highest pair)  But I have moved the carriage sheds to this end of layout, mainly because I had little room to place them where they should have been.


Lining up the turn table was difficult. The instructions were not that helpful.


Carriage shed will go here and I will use a two track version of Stuarts car shed here.
 Walker Models  http://modeltrainbuildings.com.au/


Al has a go at lining up the turn table. Nice job on the underlay(ing) and track laying pal :D


So where am I?  Well after a couple of weeks of laying on my back under the layout, upgrading wiring (fixing problems) I got to sit down. My job was to build all the circuits up, and prepare the point motors. The untidy work table is not helping, I guess.


I am always looking for something...Oh!  Don't you just love the signals 👀


Unfortunately we had to move the track on the bridge and fix the piers. Al got this done too. Workaholic!

 What was I looking for?? distracted , forgotten?  Oh well back to the work table.


Ok, green box on floor has servo motors mounted in a special cast bracket that Roger Lloyds friend Tony, cast up for me. Should order some more.
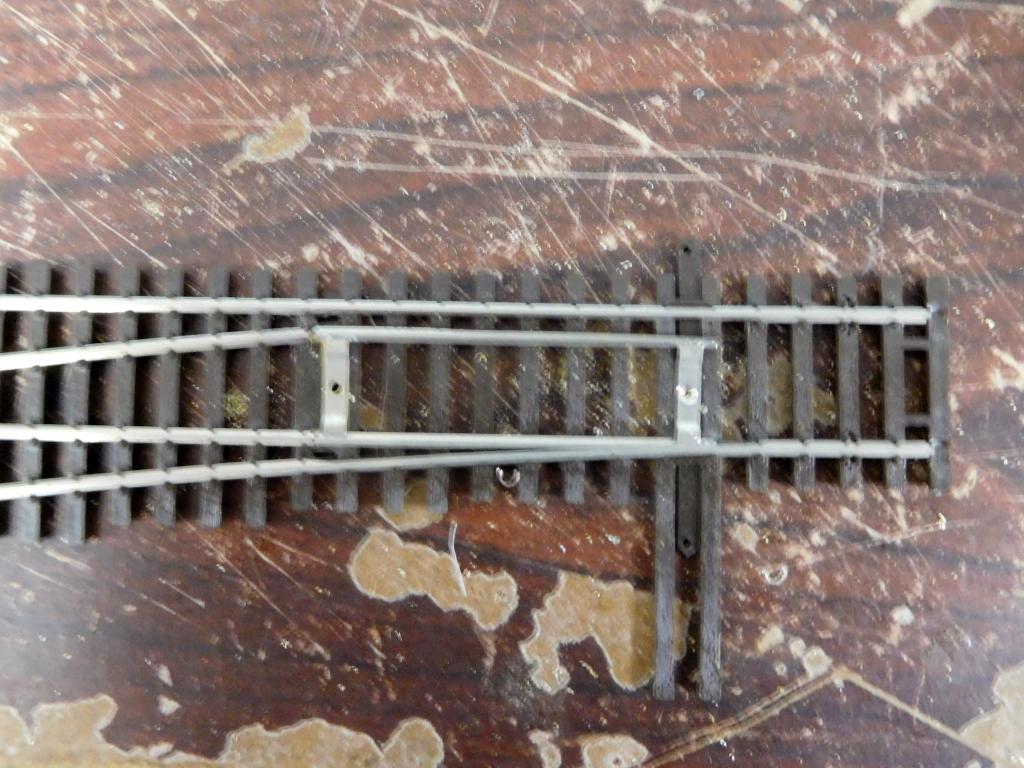
Here I am cutting out the sleepers under the ends of the frog, where the blades attach. I have to remove a connection here that causes a direct short. I will solder some circuit board ties to replace the ones I have cut out.


Gently break out the sleepers and usually the brass connector comes away easily, If not help it with soldering iron, and de-solder the rail to enable a half rail joiner to be pushed on to hold point blades in place.


Cut away the extra sleepers at each end of point (3)  Then de-solder metal joiners holding blades together. Remember which blade goes where, because they are different. I didn't get a shot, but I then use a long circuit board sleeper cut down to size, and drilled out and insulated with a shallow cut each side. Insulate at different places and not over the hole drilled for the point machine. Invites shorts and weakens circuit board. I simply push the blades into joiner making sure they move freely, and then soldered to the throw bar. Test to make sure you can move the bar from side to side and blades align perfectly.  Solder wires to track red and black need to be placed on correct sides. Place point in its position and note which rail is black. Solder accordingly.  White wire has to go to frog. But that is covered in plastic on bottom. However these DC points have connections built in linking both inner rails to the rails heading towards the blades. Simply cut gaps on the blade side of the frog, and use insulated joiners when connecting rails to this end of the points Solder the white frog wire to one or both (they are internally linked) of the middle rails that will be insulated and join the white wire to your juicer or point machine which will switch the power to frog, to match the way the road is aligned.
Test the points make sure that no shorts are left in system. I always solder the red and black wires to the outside rails but link them to the next closest rail which forms the diversion road.
I also use fine wire to link the point blades directly to the red and black feeders. This should guarantee power is always available to them, Sometimes corrosion or white glue will insulate blades over time.


Cheap fascia mounts from Tam Valley are recessed stopping clothing from snagging the point buttons. Simply glued together and attached to Singlet point controller


Simply attach the controller to the mount Test and put aside till I can buy the correct size hole saw. Then I simply pull that screw out, place fascia mount in hole and align circuit board and tighten screw to ensure buttons are free. 4 screws in mount secures it to fascia.

oops!  Better get back to the points. Alday is fast approaching!
Oh and I should mention that I had a visitor Saturday as well (I am indeed blessed)


 ADDENDUM

Graeme Schulz has come up with a way to cover the corners. I had some board cut up to size and now we are working out how to secure it in place. The problem is that whilst it hides track we dont want in scene, it makes it difficult to  re rail trains, (and clean track of course) if the worst happens.


Ok so just sitting for effect The lower sheet will match the top sheet. Allow trains or track to be accessed from a stool.
We decided to cover the brickwork with dry wall (plaster) between the piers top and bottom. 


So my job is to knock up a frame and fit it so that drywall can be screwed on to help secure the corners, and further cut down on the dust.


Looks like the TV will have to go. And I will use the wall to move the power boards to a better more convenient place.


Sheet was cut a little high. Will need to cut it down and sit it back about a foot and a half  :)


It actually hides the layout as you come through the door. I like that.


Again sheets were not correct height. But an easy fix. Even in white you can see how it changes the look of the corner.


Carefully matching the scenery and layering the back boards should help this scene immensely . Dry wall on the bottom, relocated power boards and an untidy area is safely hidden away. Always mindfull, that this old bloke does not want to climb underneath any more than he has to.
Cheers
Rod Young

2017/01/09

2017_01_08 Still clearing table top!

2017_01_08  Finding homes for stuff as I clean down the benches!

Filling plastic bins as I find homes for stuff cluttering up the table tops. Making good progress too.

Exciting thing today was seeing my N Class and D3 run with sound for the first time.
Thanks Gerry, I hate taking you away from your own models, but I feel privileged that you can help me.

The N Class and the D3 are destined for here :D

Gerry thought the N Class was a badly built engine. It figures as it was an Alco, whilst the D3 was a BGM, which were the best models of that time.
Cheers
Rod

2017/01/04

2017_01_04 Clean Up Day

2017_01_04  Cleaning up and preparing for the next job, which is fixing the wiring in the Coal Siding.
Then laying track towards Albury.

So today I was able to sit and calmly sort through all the stuff laying on top of the layout, finally :)


So to allow the wiring to be tested here at the Coal Siding, I had to clean it all down. I did find a home for most of it, some found the bin, most found a plastic bin, with similar stuff, to help with finding it when it is needed.


The rest found a place here. Part sorted, just need to work out what I should do with old epoxy models, that have become brittle, and probably need stripping of couplings and wheels and binning.

Tomorrow we had to cancel ALDAY , mainly because although I forgot why only remembering next Thursday was going to be out of action, I remembered why in the finish.
I have an appointment with my Eye Surgeon, and its time for another needle, which should stop me going blind in my left eye. Any wonder why I am going to try to forget this day, which comes much too quickly every couple of months. Mind you the treatment does work, No pain no gain?
Cheers
Rod

2017/01/03

2017_01_03 Happy New Year Folks!

2017_01_03 Spent a few days socialising  and even had some time to start sorting stuff out and boxing it to get it clear of the next work spaces.


Ok its not perfect, however I have my work bench back. All the boxes at left of and the ones underneath are sorted or binned.
Going to set my desktop computer up here as it seems to handle decoder pro better than my new laptop, which just does not like the PR3 drivers.


What is junk?  Probably save the containers and a few NSW wagons. The 80 footers are not worth saving. Very brittle.


Even so, a lot of stuff has found a home.


The temporary bench (over a year?) is gradually cleaning down, using this cleared spot to sort through boxes of stuff.


Finally got everything to do with DCC conversions in one box. Resistors, LED's, speakers and boxes, silent and sound decoders.... etc etc.


So I blurred this one ugh!  But this is a shinohara DC point that needs converting for DCC. The two nickel silver joiners linking the point blades will become a dead short and need to be removed.
To do that I need a drill..... Drill out the two staples and the blades fall out free and so does the throw bar. Remove remains of rivets and then you need to replace the connectors exactly with a long  circuit board sleeper. Solder to the circuit board copper and then cut a gap in the copper to insulate the rails. Drill a hole to allow point machine to connect and throw the points back and forwards.


See the brass bar on RHS? this also is a short. I drilled out the rivet, and found it was permanently attached to the sleepers moulded to the rails. So I used a large drill and removed the remains of the rivet and opened up the hole almost as wide as the strip. I then used a sharp, cutting plier to cut it top and bottom and create an insulation gap.

 
The next job was to isolate the frog by cutting through both middle rails. I will now have to wire the frog up to match whichever polarity is required as the point motor switches the points. I can use the switch on the point motor, or I can use an electronic frog juicer.

Well thats about as far as I got.
The air conditioner maintained 24C and it was much better than last year, for sure.
Cheers
Rod