2014/02/19

2014_02_19 AN Sound Install

2014 Feb 19  AN Sound Install 
Temperature dropping and a pleasant 30C at Midday.

This is my Official AN sound install :D
It combines two great products The Auscision AN model Diesel Electric Locomotive

Auscision product

And our great friend Mike Walters who manages...

DCC Sounds of Victoria

This is my second attempt at installing sounds in an AN.  Probably better not say any more about my first dismal attempts, suffice to say, that I took a few days to settle down and this morning ,armed with good advice from DCC Sounds, VR Enthusiasts Forum and Rail Page Forums, I was able to take my AN out of its box, add the sound pack kindly prepared by Mike Walters of DCC Sounds and install it complete with modifications a test run in under 15 minutes.  Now I fully agree with Auscision. It is indeed a perfect sound installation and I believe the one slight problem has already been fixed for any future models. So my apologies for misleading you all on my first attempt. Mind you I will try to finish the G Class this afternoon, and that is a different kettle of fish!

AN install step 1.


Take the model out of its packaging and clear an area if your desk is like mine :(
Now loosen the body from the chassis by using your finger nails and easing the body away from the chassis by gently bending it back to disengage the holding lugs. I use one hand either side of the model, one forward of the fuel tank and other rear of it.

Hold the heavy chassis, because when the lugs disengage it easily falls apart!


Their are no cables connected to the roof, however that leads to one of our disappointments as the contact springs are of poor design, easily rectified if you need to by hard wiring them.


Separated..


Now lets open the Loksound box which was ordered to fit into an AN Class and utilize both speakers.
 

Not only were the speakers pre wired to fit, the instructions outline how the function buttons work and refer you to an install page provided by Mike to further help you out
Diesel Installs


Loksound unit out of the box. Checking the pins on the decoder .One end is recognized by the missing pin and the different female edge.


So having worked out its orientation, check the mounting position is free of wires and push any aside that will prevent chip from seating, Near speaker box a bundle will need adjustment too simply place the Decoder on top and it will snug down gently into position if all is ok.


I use blu-tak to fill in the huge hole in the speaker box, which if left open will partially disable the usefulness of the speaker box which is their to stop the rear of the speaker from cancelling out the sound from the front.

I have some Chrystal Kleer (?) which I now smear around the box to properly seal the speaker.


I am a messy person but I can wipe it clean as it is water soluble.


Press speakers into place on lugs provided by Auscision, and wipe clean of  excess glue.


The ESU speaker enclosures go into the scrap bin.


Now the electrical connector in the roof of the body is too wide and fouls the decoder pushing down on its rear edge breaking connections,(not pins though thank goodness) and sometimes disconnecting the headlights or stopping the body from sitting correctly when you put it back together again.


I snipped off about 3mms but left the screw hole on the end , thinking it was out of the way. In fact the front of the body is sitting up slightly causing the headlight to fail, and it looks like I will have to remove the screw and glue the board in place.(I have treated this as a mistake on my behalf and ignored it for the purpose of this speed test. You might need to cut the whole edge off to make this work, I think.


Job done and so lets see if the body fits!


I heard the body tabs click in place and it appears that the install is finished and the clock has clicked over 15 minutes! Now that's a hell of an improvement over any other engine except maybe the 422 Class which uses the same principal of carrying light to the headlights.


The only thing to do now is put it on the track and test it all out :)

And of course it worked just fine :D   In the video, I showed the start up, which is short and sweet, but the camera only records a few minutes and switched off as the shut down sequence started. Now the shut down is really sweet. Takes about 50 seconds before the big engine is quiet. Maybe another video is in order ;)
The demonstration shows the loco in throttle 1/128 and using F5 to ramp up engine revs. I am in fact simulating starting off a heavy train. The engine creeps and the notches rise to about 6 before the load starts to move off, throttle now increased to 15/128. as starting off like this would possibly happen in a loop with a point to negotiate to get back on the main line. I left the throttle on about 15/128 and switched off F6 to maintain Notch 4. :)
To me a realistic train start :)
Cheers
Rod Young

2014/02/11

2014_02_11

2014_02_11

Well I guess I am most dissapointed to report almost nothing has happened. Since returning from Bendigo I have rediscovered the joys (?) of working with sound again after Tony came for a week and a 45 minute job turned into a three day disaster leaving both of us not interested in doing much for the Layout. Constant Northerly winds lifting temperatures from 41C in the shade to 55C standing in the wind have killed off any ideas of working in the shed which I am keeping at 29C Day and night with the evaporative Air Con fitted to the roof. Still too hot though.
Today is the best day since I returned from Bendigo. Perhaps a bit of time in the shed tonight will start the ball rolling again.
My camera is playing up and I want to finish off the sound install on the G class put aside for Tony's visit. But I do want pics as I go, so will try to see what I can do with the older digital camera.

I got a call from Southern Models and was told my VR oil tanks will leave China this month after the people return to the factories and things get back to speed. Even had the priveledge of paying for them :)
Here are the pics

four like this one with wood walkways and spoke wheels

Two like this one wood and spokes again
 And the last four are more modern like this one, disk wheels and metal walkways.

I purchased three 3 car packs and 1 individual pack which completes my 10 car BP train of the mid 70's

Cheers
Rod
EDIT   Their is a discount of nearly $30 a pack if anybody wants to pay for them now at
http://www.southernrailmodels.com.au/article/5th-january-2014-belated-austrlia-day--new-years-promo

2014/01/29

2014 January 24 through to 29

2014_01_29

Busy few days that started Friday last with a trip to Bendigo. Stayed the night and visited Geoff at PCB hobbies where I was relieved of a few hundred dollars for buildings :)
Early Saturday morning Tony and I drove to Corio and attended their Exhibition. Met too many people to name but if you were into Model Railways in Victoria, you were probably there and we would have said Hello.
Austrains released 135 G Class diesels so that some of us were lucky enough to get one to play with.

On the way home from Bendigo I found a great little steam railway operating along side the railway line at Elmore and I will write this up later as it should interest many :)


Now thatis what I call a Walker! Wonder if he had to pay more than $300 for it? ;)

Back to the Ho Ho Ho size ;)


So I was fortunate enough(?) to grab hold of one of the 90 FA G Classes landed for Corio :D

However our stupid Chinese friends set us all up for a problem. These nicely detailed G Class bogies need to be part stripped to get the screws out securing the body to the chassis. In this photo you can just see the screw head situated directly above where the middle brake cylinder should sit. I tried to use a small screwdriver over the brake cylinder, however it simply broke it away. I then removed all 4 cylinders which caused the piping to fall away as well.
What is with these Chinese pricks? Do they have to make everything more difficult than it need be? What was wrong with placing these securing screws at one end of the bogie allowing you to turn it aside to remove the screws. I have no idea how I am going to get the screws back in once I install the sound :(
Which reminds me We have been fitting Powerline shells to new mechs for 30 years and in 90% of the cases using screws to mount the bodies! What were the R&D guys doing to let this happen?


The new factory is using the Auscision A Class type boards. Unfortunately I bought an ATLAS type replacement board which would have allowed me to do the normal Austrains Tsunami install. Now I will have to strip out the old board and solder in the new one.
I note that the board has to be removed anyway to access the two speaker enclosures over the tail shafts.


The offending screws and the removed brake cylinders :(


So the light board is unplugged and removed.


The top of the speaker box is lifted clear revealing the speaker mount.
It appears to be designed for a smaller speaker such as this one...

     50331     Loudspeaker 20mm, round, 4 Ohms, 1~2W, with sound chamber

 Loksound 4 ohm speaker


Well I seem to have packed away my speakers. Till I find them I cannot continue. But I have decided to cut away the lid that I am holding in the last picture, that is if the body does not do a good enough job in separating the front from the rear of the speaker. But if I decide to fit the Loksound sound chamber I will still be able to have a mount to the side to hold the new board away from the motor. However I have just watched this video, and it has taught me a few things :D
Watch it and let me know if this turns your speaker ideas upside down :)


Cheers
Rod Young

2014/01/21

2014 January 21

2014 January 21
Well not much is happening. At first I thought it was the heat. We have had at least 10 hot days yesterday and today a cool 37C after 7 straight 40.4 C in the shade :(
So I grizzle when its cold and so do I grizzle when its hot :(  However keeping cool is an expensive proposition whilst at least here in Yackandandah, is just a matter of wearing warm clothes when you need to warm up ;)
But I have noticed that my weight is creeping up again. No longer 99 kg and back up to 110 kg. You know it took about 10 days to lose 6 kg  and a year to lose 17 kg in total.   It took about 4 weeks of lack of walking without changing the diet, to put it all back on again. I am not looking forward to another 12 months to lose it again. The Doctors have got it all wrong. The body memorizes what it looks like and works against you to maintain the "shape" whether you like it or not. So the lack of exercise has promoted a bit of depression and grandpa naps in the afternoon. I have to start again :(

Last night I started to set  out the Wodonga SG loop. Cleared the roadbed which has been sitting there since November (?) and temp.laid out the BG.
Cheers
Rod
ugh! apologies for the spelling I had to correct on a second reading :(

2014/01/14

2014_Jan_14

2014_01_14 Heat Wave is here!

When is 29C cool?

I guess when its 40.4 in the shade outside?
I have a swampie on the roof. It ran all day with just the fan and turned the water on and within minutes the temp started to drop.  Not that I spent much time in there today.
My last fortnight has been getting reacquainted with good friends :) As people travelled past Wodonga and took the 20km diverge to stop and stay awhile. So not much time for track laying ;)
Today I tried something less strenuous.


I like these ETM's unfortunately they are far too modern for me. So......


This is what we replaced our vans with, and nobody makes them at all.   So it was time to see what I could do. (wongm picture)


The disc is punched out of styrene and will be covered in reflective tape. The battery box is c section which will hide the wires. The red LED of course is removed from a light strip and flashes nicely using the original Ring electronics. I will paint this red just leaving the lens clear.


The battery box is simply C tube to hide the wires.


The light should be round and the whole thing is slightly bigger than it should be.  I am going to try and disassemble the Ring unit and if I can easily recover the LED from it I will build it into a round red button which will much improve the unit. (Here it is shown before gluing. It will not keep its proper shape till I paint and glue it)

Cheers
Rod

2014/01/08

2014_01_08

2014_01_08

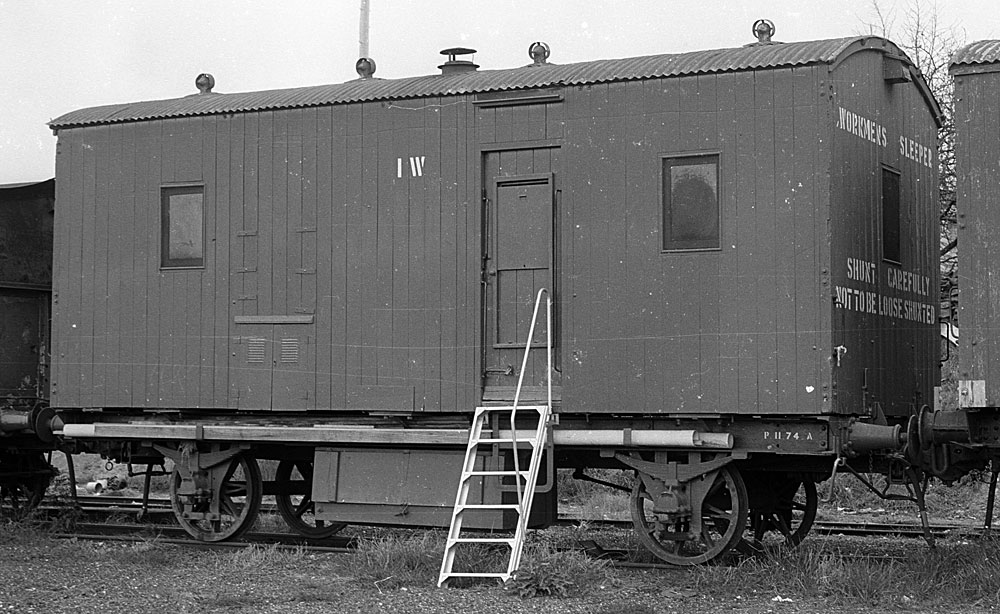
For those of you who read Mikes comment yesterday :)
This is a workmans sleeper that would like nice on any Victorian layout :)

Rod

2014/01/07

2014_01_07

2014_01_07  All quiet on the front however an apology is in order

I stated that SDS had supplied standard head KD couplers.
In fact I confused myself with the picture of the low Auscision small head coupler appearing to be smaller than the SDS one. I have since noticed my error after vigorous prompting by Rick and others.
Thanks guys ;)

The KD gauge is of course fitted with a standard head :)
Cheers
Rod

2014/01/06

2014_01_06

2014_01_06  Got a phone call on Saturday and a parcel today

First my Brass N Class has arrived and is just waiting on a sound install

http://www.trainbuilder.com/nclass

The Parcel from SDS Thanks Steve :D


First for the year, and I think 2014 is looking good for most of us :)


Tony's T335 was brought up to collect the new wagons, so we shunted the first half into the train to see some comparisons.


T335 ready to depart for Bullarto, however the Engineers had a problem with the unpacking as the crane needed some attention. (funny thing, you accept the weathering on the T, and hate the dust on the van roof)

 U1621, fresh out of the shops with steel doors fitted


As the crane swings across....   ;)
 Nice crisp detail and KD #5 by the looks?


Took the opportunity to take this shot when the clutch on the cranes cable drum slipped and gently laid this one on its side (and I have no explanation how the next picture happened, none at all :D )


A shot from the crane.

1473 fitted wooden louvre doors.


 1473 coupled to 1053  Picture demonstrates the incorrect coupling height we all knew about but for some reason accepted, and it took 5 years of production before Auscision acknowledged and fixed the problem. Also note the head size as a comparison.


SDS have produced a nice van, haven't they?  :)


Cheers
Rod Young

2014/01/03

2014 January-Happy New Year

2014_01_03 Friday

G'Day to you all and a Very Happy and prosperous New Year to all of you :p

Still have not done any wiring, but my parcels did arrive from London and the USA. So I have fitted a couple of sound decoders as well, as started to fix in the Wodonga Station track that was delayed by missing points.

You might like my Future of the Hobby that I posted elsewhere?

I just looked into my magic copper water bowl (It has a great history too being handed down from generation to generation and once belonged to Uncle Nostodamus )
Actually I see things are going to change in a big way.

I have this thing in front of me, and I don't know what it is called (because today it is unnamed :)

It is a development of the 3D Plastic Printers of the early 21st Century but other technologies have been added to it. in those times Imaging machines were called Flat screen TV's, maybe you still have one?
Some of these machines could have simulated 3D but you needed to wear green and red glass lenses in front of your eyes.
Samsung actually spent billions developing a 3D system that was brilliant for its day and glasses were not needed. Alas they were much too late because a young fellow from Belgrave in Victoria combined his love for Computer Train Simulations with his Fathers interest in Haleophotography And invented lifelike and life sized 3D images that could operate at 500 frames a minute and fooled the eye into believing a real steam engine, or anything else was sitting in his work room.
Simply put, this changed the face of operating model railways over night! (it actually split the hobby amongst Museum Quality solid modellers who spent most of their time created fantastic models and train operators who just wanted to drive their trains)
Now you download a Trainz map which uses modern photo realistic constructions of Railways anywhere in the World.    You download any models you want and following the easy instructions, you build your empire.
When you are finished, probably 3 or 4 Hours , you switch the lights down low and climb into your  chair and start the simulation.  In a small 3.3 m square bedroom, your brain is tricked into seeing you at the controls of a full sized engine.
Today we are riding Heavy Harry out of Spencer Street on the Spirit of Progress. It is November 1953 and as we pass by PascoeVale platform a small 8 year old boy is standing on the third rail of the gates with a stunned look on his face. You see he always ran down the Gaffney Street hill to wave to George Lynch, or any of the Drivers who ran his favourite engine up the hill any night. The look of disappointment in his eyes was there and the Driver waved back to the little kid, hiding the fact that this old man was excited to have Harry on the front, just this one time. The kid was me :) and I did learn to love Harry just as much as I did Matthew or the other blue machines whose job was to get the SOP up to Albury and back every day.
Anyway on the way our simulation comes across a glitch. Its a view of Broadmeadows station from 1963 that has accidentally been included in our simulation. So it is paused and changed out, showing Broadmeadows in the 50's.....  to be continued
Ha Ha
Rod Young  Happy New Year to all of you ;)

2013/12/19

2013 December 19

2013 December 19  Bloody Hot. Thunder in the skies and..

All my plans come to naught and nothing much is done :)
Well I guess I gave Decoder Pro and ESU programmer a bit of a work out.
I now have 12 engines sitting on the Bench in various conditions as install sound in them :)
ah well so far I always have had a tomorrow ;)
Cheers
Rod