Nice Day! The Holdens destroyed the Fords once again...
and I started to experiment with track laying using the new sweep sticks. They work very well, although I have discovered a couple of problems already. The cross pieces are supposed to tie in the parallel tracks, in my case to 2".
However they are loose and don't work well for me. As I don't think I will go under 2" I may have to glue them together. Already broken a few location pins.


Here I have white glued the underlay to the ply wood, and needed to weight the track down to ensure it glued flat. Not sure what that is going to do to the underlay yet. But I also forgot about sealing the ply! I should and I think I will have to paint the ply to keep the water out of it.
Just forgot this little detail in my need to get some track down

Having the correct radius sticks certainly helps with this job. Having all the different needed radius is not cost effective though


In fact the points for the yard were somewhat like this in reality, and the fifth crossing existed prior to the relocation of the SG When the old B Box was installed it controlled the main crossing on its front side and behind it was a SG track which went straight into Loco.
Not having enough room between the back drop and the station to install a turntable, left me with the option of sending the Loco tracks to the turntable crossing high street and servicing a turntable approximately where the Mann's car park was behind the Retrovision Store.
Ok that's about it, and its time to go and look at how the white glue dried
Cheers
Rod
2012 November 22 Thursday
As always things catch up with me and take me away from my job
The white glue is not as I hoped. Not sure why it worked on the Murray Railway layout.
And I have to waterproof the ply. So picked up the paint and a new glue today and experimenting with both will happen as I get time.
Have people noticed this new scenic supplier that was forwarded to me recently?
AUSSIE SCENICS Link Here
Cheers
Rod
2012 November 26 Monday
Whacko!! the temperature put on a real spurt yesterday
Despite the heat and the wind before it, I have played around with the track and got a little laid down.
Two great products and some Office Works tacks
Anyway without further comment...here are a few pictures


The thumb tacks replace the bricks and boards. Allows me to push them down between the sleepers and keep the rail down whilst the white glue is still drying. I reduced the amount of glue and thickened the watered down stuff that was taking too long to dry


Three products really, that make life so much easier for us. The Trackrite underlay is fantastic. Sticks down well curves without any "lumpiness" and trims easily. Importantly it does NOT rot like the Peco stuff did / does
The Trackrite sweep sticks already talked about and of course where would we be without Peco Track?
By the bye it appears that Peco have discontinued Code 100 track ?? I heard the dies for extruding the rail have worn out, and so little is bought these days that they decided to discontinue it and now sell only code 83 and code 75
EDIT Posted late because the Internet never came back on. Later learned the modem had failed. Fortunately I had a new DLink in store and Telstra have agreed to replace the damaged one (2 months old)
Cheers
Rod
ps Can't help myself just keep talking....on and on... and on....
2012 December 3 A Monday
Much cooler and a fairly windy with scatterered cumulus
So the last Super v8 race of the year has been won and an era ends. The dills have let mercedes and Nissan in in 2013 and I guess more are coming in the future. Well if the heat lets up, more time for Model Railways, I hope!
So what did happen this week past?
Track laying was a bit of a change in pace, and I am reasonably happy with the results. The trains run smoothly around the curve, and I cant ask for much more than that.
I decided to do some programming Saturday. After sorting out the mess on the desk, I am thinking their has got to be a better way than this! Didn't I just sort all this out last month?

I
started to think how I could improve things. So I designed and built a
case to help set up the DCC testing and programming equipment. Put a
false back on it to hide all the wires and am happy with the result.
I can simply push all the excess cables into space behind, and unplug power supplies not required. The netbook sits close by to run JMRI or Lokprogrammer. This is neat! But still have not been able to start programming. Maybe this afternoon if I get the Internet back today.
I can simply push all the excess cables into space behind, and unplug power supplies not required. The netbook sits close by to run JMRI or Lokprogrammer. This is neat! But still have not been able to start programming. Maybe this afternoon if I get the Internet back today.

Using
the modified Peco track spacer which gives a 2 inch separation. Two 70
cent plastic gauges set on a wooden block. Works better than a bought
one too.

First
test was attempted on a RCS radio throttle in DC. Found a Lima DCC 422
Class Diseasel, and made up a short consist and attempted to proceed
down the freshly scrubbed track....nothing happened ?? Tested the
voltage and yes I had 11 volts. However only 1 amp. The old Lima had not
turned a wheel in 15 years or more. So found a Powerline 81 and a BL.
Both engines managed a hesitant 10kph over the new section of track,
but would not return unless I turned the Locos. So all my old DC Locos
are going to need heavy servicing.
Could not get the body off the 422 !! Forgotten how they came off But the tabs front and rear of loco are the problem. Almost bent the
chassis in half and still the tabs would not let go. Like I said, if
their is an easy way I did not find it, and another few hours gone and
not much to show for it.
But the tabs front and rear of loco are the problem. Almost bent the
chassis in half and still the tabs would not let go. Like I said, if
their is an easy way I did not find it, and another few hours gone and
not much to show for it.
Could not get the body off the 422 !! Forgotten how they came off

In a moment I am going out to install a ring main and droppers to the new track so that I can test it in DCC.

So
the big curve is mainly finished, now I need to install the points at
both ends and lay the yard tracks on the two completed boards.
Then add the next boards and keep going... My Christmas project :p
Then add the next boards and keep going... My Christmas project :p
Here
is my new desk. Well worth the effort. All the programmers now have a
place to live, and the wiring can stay in place. The net-book is close by
for work with JMRI.
So its lunch time and out side and do some more
Cheers
Rod Young
Cheers
Rod Young
2012 December 5 Wednesday
Warm day but windy enough to knock my 3 tonne Rover about on the Freeway!
After the shopping trip, taking a friend to The Albury Private Hospital for Day Surgery then picking up some stores it was time for Evening Dinner.
I did get out for an hour or two, before remembering it was Club Night and it was too late to go
So what can you do on a day like today?
Well a trip to Jaycar will cost you $250 and out you come with two 400 volt 35 amp bridge rectifiers, 100 m of 30 amp cable and two 100 foot rolls of dropper cable.
Another $12 at Reject Shop gets you a white board.

In
two hours you can use an auger bit to cut three holes in the cross
pieces to support the DCC Main Bus. 30 amp cable Black for Common and
Red for distribution. I will have to add as many as 6 local Distributors
to isolate all the yard tracks and install short protection.

Then I threaded both new bus cables around the island modules in the fresh holes.
As you can see on Tuesday I soldered all the droppers in place. I have a black and a red wire shown here. Lighter gauge as they only need feed a yard of track. I do not rely on rail joiners to carry power. Every piece of track whether it be 3 inches long or a meter long gets a dropper,or at least is soldered to the rail it connects with. Every point is also connected to droppers. As well the blades of the points are connected to the live frogs and switch with the frogs.
As you can see on Tuesday I soldered all the droppers in place. I have a black and a red wire shown here. Lighter gauge as they only need feed a yard of track. I do not rely on rail joiners to carry power. Every piece of track whether it be 3 inches long or a meter long gets a dropper,or at least is soldered to the rail it connects with. Every point is also connected to droppers. As well the blades of the points are connected to the live frogs and switch with the frogs.

Final
job was to use Double sided tape and fix the new whiteboard to the
wall. Hopefully the new rearranged workbench from the weekend plus this
board will help me to reorganise my way of doing things, and catch up
with the many half finished projects.
(edit March 2013 Double sided tape failed twice (thanks Mr 3M :( ) So drilled into bricks and attached with plastic plugs and screws)

I
buy Clipper bins from Coles. These meat containers fit two large
engines side by side, or have sufficient room for a disassembled engine
where body and chassis can be stored side by side. When I need parts
for an upgrade or repair, I jump on the "net" and order what is
required. The locomotive is left and stored in bits in the Clipper bin,
on the shelf. Weeks later or even months later the supplies are finally
in my possession. However in a lot of cases I have forgotten about which
project etc etc...

So I have a basket full of supplies and 15 clipper bins that they really should have been added to when the post arrived.
Like I said the reorganisation and the white board MAY help sort this out in the future.
Just to add drilling 90 holes with the auger, another 40 holes with the Dremel for the droppers...
tinning each of the rails, particularly the code 100 stuff which is over 30 years old. (Haven't had to open a new box yet ) then tinning after cutting 40 droppers and fixing them in place takes
a fairly long time, but the pictures don't really show it, do they?
) then tinning after cutting 40 droppers and fixing them in place takes
a fairly long time, but the pictures don't really show it, do they? 
Cheers
Rod
Another wasted railway day I say again!! How did I find time to go to work all those years? 
Well The Doctor patted me on the back and told me I was a "good boy" and I can relax as a special treat and enjoy a normal Christmas Dinner. However I must run 5 km's on Boxing Day to keep my weight down. I am still thinking about this, and I have a feeling I really can't relax on Christmas day...Indian giver!! Got my new hearing aids...Al I can say is I don't know how you people put up with all that noise!! I don't think I will ever get used to this noisy keyboard for instance! Can you buy soft touch ones??
(with apologies to any Indians out there )
On the way home I stopped at Bunnings, and the Auto Electrician, and the Electrical wholesaler..
$212 lighter in the hip pocket area (Strewth that's $450 in a week )

Then again!

Adjustable Reamer HSS Blade 23 to 26mm (item number 160879860410)
Made an offer both for $50.00 with $4.99 postage. Better than $89 and $107 for the Russian built ones from Sydney
Ah that feels better No stuffing about, and would you believe I visited two tool shops in Albury today that swore such a device did not exist
Cheers
Rod
Hello Gary
Yes I did think about a reamer. I spent three hours today between Bunnings, Gasweld and Alltools being told that you just can't get this stuff in the size I need.
And I have a few small round sized bastard files here, and although you can spend an hour getting a rough shape (remember I am a "bastard" modeller all thumbs, plenty of ideas and little ability
I need help to get an accurate hole
Why an accurate hole? Easy these 23mm speakers already too small for the job we ask of them, do need every advantage we can give them. So they need to be sealed in a sound box or baffle. The reason for this is that (Gary knows this but some might not) sound is generated by the cones pulling and pushing the air behind the cones and in front of the cones. WE MUST keep these two places separated, because they tend to cancel each other out. Pushing the speaker into a neat fitting hole and using some silastic to seal it in guarantees that the two sides will not interact and gives the poor little "fella" some chance of at least producing some sound. At the moment I have 5 Flat top T class with excellent sound systems or recordings. However deaf bastards like me cant hear them. I have to build baffles to increase the volume (gain about 30% to my ears) and also smooth out the sound
Now back to Gary...
I just need a way to increasing productivity. I have fitted 10 sound systems to my stuff, and another 30+ non sound systems, mostly in older locomotives that were not DCC ready. I have also fitted another 50 odd systems for friends and I still have 20 Loksound Ver 3.5 decoders loaded with Victorian sounds to fit.
Just trying to make the job as quick as, and best as I can
Now that I have ordered the reamers that problem is solved.
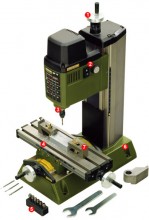
Now I need a mill Maybe one of these

Cheers
Rod
Like I said the reorganisation and the white board MAY help sort this out in the future.
Just to add drilling 90 holes with the auger, another 40 holes with the Dremel for the droppers...
tinning each of the rails, particularly the code 100 stuff which is over 30 years old. (Haven't had to open a new box yet
Cheers
Rod
2012 December 7 Friday
Another wasted railway day
Well The Doctor patted me on the back and told me I was a "good boy" and I can relax as a special treat and enjoy a normal Christmas Dinner. However I must run 5 km's on Boxing Day to keep my weight down. I am still thinking about this, and I have a feeling I really can't relax on Christmas day...Indian giver!! Got my new hearing aids...Al I can say is I don't know how you people put up with all that noise!! I don't think I will ever get used to this noisy keyboard for instance! Can you buy soft touch ones??
(with apologies to any Indians out there
On the way home I stopped at Bunnings, and the Auto Electrician, and the Electrical wholesaler..
$212 lighter in the hip pocket area (Strewth that's $450 in a week
on
the left a 20mm hole saw for cutting out speaker enclosures for my
Loksound projects and to the right another 22mm. I guess they don't make
23mm ones so I will have to sand a bit off with the Dremel.
next to the right is the arbor to hold it should I wish to use a drill on them Directly in front is a bag of fast connectors and some loose ones, 123 in all about 12 cents each. I ran out yesterday.
a set of countersunk drills, my existing ones are worn out and the Allen key is rounded anyway.
Then a Dremel cutting drill to cut or open out holes again for sound installations.
Then two 100foot rolls of heavy electrical wire single core with multi strand copper inside.
oww... all I have to do is use what I have got, and do without any trips to the Hardware for three months at least
Cheers
Rod
2012 December 7
This 22 mm hole saw is annoying me I have a perfectly round hole which is about 2mm too small (not 1mm as you would expect)
I wonder if someone out there is able to create a new light weight saw 23mm in diameter?
I wonder if I can attach cutters to the side of the 22mm saw to increase the diameter to 23.5 mm??
Would it need to be welded on, or because I am only cutting very slowly into 1.5mm styrene, could I just epoxy them on?
My idea would be to start the hole at 22mm and starting 5mm up the barrel of the saw, slowly taper the cutters out to the correct 23.5 mm....
sort of like a large reamer... thinking ?? I think it would work. This is one time consuming job that could be eliminated by a simple tool
Then again!
R.H10 27/32"-15/16" 21,43mm-23,81mm
There is a bought one Now to find a price
There is a bought one
over engineered to hell and an yet to work out how to widen the diameter of cut, turns out unsiutable for job :(
Adjustable Reamer HSS Blade 21 to 23mm (item number 150896655472)Adjustable Reamer HSS Blade 23 to 26mm (item number 160879860410)
Made an offer both for $50.00 with $4.99 postage. Better than $89 and $107 for the Russian built ones from Sydney
Ah that feels better
Cheers
Rod
EDIT (Mar 2013) Does not work!!
G'day comtrain,
Rod, it is NOT possible for a hole saw with a diameter of 22 mm to cut a hole that is two mm in diameter smaller than a hole that is 23 mm in diameter - THE LAWS OF PHYSICS WILL NOT ALLOW THIS. If it IS doing this, then it is only cutting a hole of 21mm in diameter (and is, therefore, FAILING to do the job for which you purchased it)...
...from that which I can gather, you are cutting these holes in Styrene - a very 'soft' material that can be worked by almost everything. Have you considered reaming out your undersized holes with a suitably sized Bastard File or Rasp?...
Jerker {:)}
Hello Gary
Yes I did think about a reamer. I spent three hours today between Bunnings, Gasweld and Alltools being told that you just can't get this stuff in the size I need.
And I have a few small round sized bastard files here, and although you can spend an hour getting a rough shape (remember I am a "bastard" modeller all thumbs, plenty of ideas and little ability
I need help to get an accurate hole
Why an accurate hole? Easy these 23mm speakers already too small for the job we ask of them, do need every advantage we can give them. So they need to be sealed in a sound box or baffle. The reason for this is that (Gary knows this but some might not) sound is generated by the cones pulling and pushing the air behind the cones and in front of the cones. WE MUST keep these two places separated, because they tend to cancel each other out. Pushing the speaker into a neat fitting hole and using some silastic to seal it in guarantees that the two sides will not interact and gives the poor little "fella" some chance of at least producing some sound. At the moment I have 5 Flat top T class with excellent sound systems or recordings. However deaf bastards like me cant hear them. I have to build baffles to increase the volume (gain about 30% to my ears) and also smooth out the sound
Now back to Gary...
I just need a way to increasing productivity. I have fitted 10 sound systems to my stuff, and another 30+ non sound systems, mostly in older locomotives that were not DCC ready. I have also fitted another 50 odd systems for friends and I still have 20 Loksound Ver 3.5 decoders loaded with Victorian sounds to fit.
Just trying to make the job as quick as, and best as I can
Now that I have ordered the reamers that problem is solved.
Now I need a mill Maybe one of these
Why one of these? Because some Aussie train builders use lumps of zamac castings that need to hacked and filed to make space for the speakers and the decoders. Files need cleaning every 5 minutes and this would make things really easy My Tool Store
Now this is how a professional presents his work
Cheers
Rod
No comments:
Post a Comment
All comments and suggestions from like minded individuals always welcomed. Help make this railway better :D